Editing Collision Masks
This section deals with the collision mask
editor.
Once you open a sprite resource, you can edit its collision
mask, which is the area that GameMaker: Studio uses to
calculate when two instances are in collision or not and trigger a
collision event. To get the collision mask editor, open a sprite
resource and press the button Modify Mask. The following
window will show:
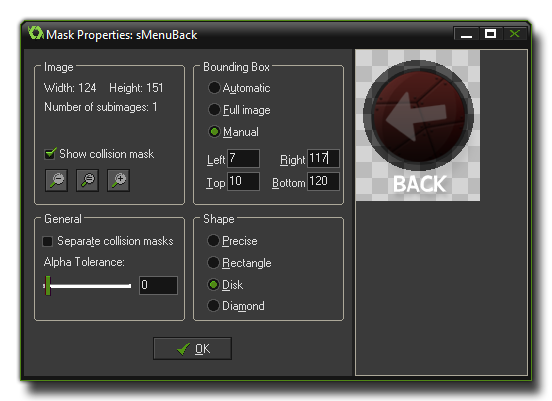
The Mask Properties window is split into various sections (explain
in more depth below) and on the right you can see a graphical
representation of the sprite with the current mask overlaid in dark
grey. All changes that you make to the mask will be reflected here,
making it far easier to visualise how they will affect how your
game plays.
Image
This part shows you some basic information about the sprite,
including the width and height and the current sub-image. There is
a check-box at the bottom where you can switch on and off the
visual representation of the mask in the view on the right, and the
zoom controls beneath this can also be used to change the scale of
the view to help fine-tune the size of the mask better.
General
This section has two options which you can change, with the
first being the separate collision masks toggle which is the same
as in the actual sprite resource itself. All this does is tell
GameMaker: Studio to create a separate collision mask for
each sub-image of the current sprite (Note that if you set the
bounding box manually, a single bounding box will be used for all
sub-images, regardless of this setting) but only if you have
selected "precise" from the properties on the right. You can also
indicate the tolerance with respect to the transparency of the
sprites pixels: with a higher tolerance pixels that are partially
transparent are left outside the mask, while with a lower tolerance
the mask will take into account those pixels. This influences both
the bounding box (when not set to manual) and the mask for precise
collision checking.
Bounding Box
The bounding box is the name given to the rectangular area that
the sprite mask fits in. Only pixels inside this bounding box are
used for the mask and will be involved in collision checking, and
by default this is automatically computed, taking the alpha
tolerance into account. If you have precise checked then this will
be separate for each sub-image too. You can also set it to the full
image (the actual width and height of the sprite, irrespective of
the transparencies that the sprite may have) or you can set it to
manual, where you can specify the bounding box yourself. When
setting it yourself, you can input the values in the boxes for
left, right top and bottom, or you can click in the sprite view and
drag to "draw" it over the sprite. Note that when "drawing" the
bounding box, the mask is automatically generated to fit within the
end values.
Shape
Here you can indicate the shape of the mask you wish
GameMaker: Studio to base its collisions off of. The default
is precise, per-pixel collision checking, but you can select here
also to use a rectangular, elliptical, or diamond shaped mask too,
with all of them being faster for GameMaker: Studio to
process than precise collisions, but no one of the three being
faster than the other. Here you can see how the different shapes
are applied to a sprite:

Choosing A Collision Mask
It is important to carefully decide on the collision mask you
use for your sprites. Although precise collision checking might
seem the most logical option, in many cases game play is improved
by using rectangles or ellipses, or simple masks that are a bit
smaller than the actual sprites themselves. Only on a very few
occasions should you need precise masks, and, in general, it is
better to have as few instances with precise collisions as
possible.
Please note too that if you want even further control over the
mask, then you can specify an actual sprite to use as mask within
the object properties themselves. In this way you can make the
collision mask completely independent of the sprite image assigned
to that object, which can be very useful, for example, when making
isometric games and you want to have a only a small collision mask
at the feet of the player.
© Copyright YoYo Games Ltd. 2015 All Rights Reserved