The Android Tab
This section deals with the Android tab of the
Global Games Settings Window.
This Android tab is split into various separate sub-tabs
(accessible on the left of the window) to make changing and
updating the information for your game clearer and less
complicated. These tabs are explained in the following
sections.
General
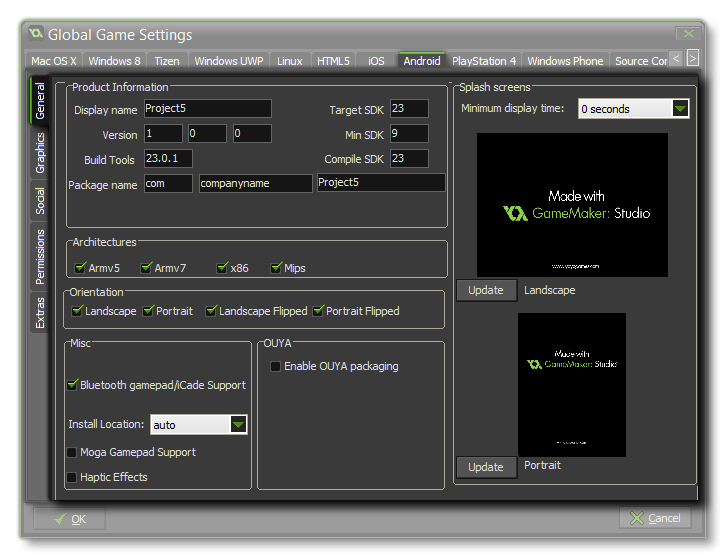 The first
thing to do is fill in the details about your game, including its
Display Name, its Package Name and the Version
info. The package name can only be made up of letters from A-Z and
numbers 0-9, with no symbols or other special characters at all,
nor should it have uppercase characters. It should follow the
format “com.domain.myapp”.
The first
thing to do is fill in the details about your game, including its
Display Name, its Package Name and the Version
info. The package name can only be made up of letters from A-Z and
numbers 0-9, with no symbols or other special characters at all,
nor should it have uppercase characters. It should follow the
format “com.domain.myapp”.
Here you can also set the build tools version to use, along
with the SDK values to use (minimum SDK version, Target
SDK version and the Compile SDK version). In general you
will want to leave these at their default values, but if your game
targets a specific Android version then you can set the build tools
and SDK values to that which you require here.
To the right of the page, you can add a splash screen to your APK,
for both landscape and portrait modes, which will be shown while
the game loads on the device. This screen should be a 24bit PNG
file, and is recommended to be the same size as the first room (or
view) in your game. If you require that the splash screen be shown
for a specific time then you can also set it here from 0 to 10
seconds (the default time of 0 means that it will only show for the
duration of the asset loading).
On this page you can also set the following options for your final
APK file:
- Architectures - This is the CPU type that your game will
support. The most common ones are chosen by default (99% of all
devices use these), but you can choose those that you think
appropriate. Bear in mind that each one will add about 1MB to the
final apk size, don't go ticking them all unless this is not a
problem!
- Orientation - Here you can choose to lock the game to a
specific orientation by checking either landscape, portrait,
landscape-flipped or portrait-flipped. Note that if you have
selected Portrait and PortraitFlipped, then this is handled as
sensorPortrait, but not all devices will allow the
PortraitFlipped orientation in this mode.
- Misc - This section permits you to add extra support for
certain features:
- you can add iCade Support or Bluetooth gamepads
(see the functions for
GamePad Input
- you can add Haptic Effects which will permit the use of
vibration in your game. Haptics are dependant of you accepting the
Immersion EULA that pops up. If you decline to accept the
agreement, then haptic effects will not be enabled, and if you have
code for them in your game, the game will fail to compile. For more
information on the GameMaker: Studio haptic effects, see the
section
Immersion Haptics.
- you can set the Install Location for your game. This can
either be set to auto, in which case the game will be
installed to the location chosen by the user on their device, or it
can be set to Prefer External which will always try to
install the game to the external storage of the device.
- you can add support for Moga Controllers for your game
here. Note that all Moga functionality is accessed via an
extension, and when you first check the Use Moga box you will be
prompted to download and install the Moga extension from the
Marketplace (you may need to log into your YoYo Account before it
can be downloaded).
- OUYA - If your game is being created for the OUYA
games console, then you can specify that the final APK should be
packaged in accordance with the console specifications here.
Graphics
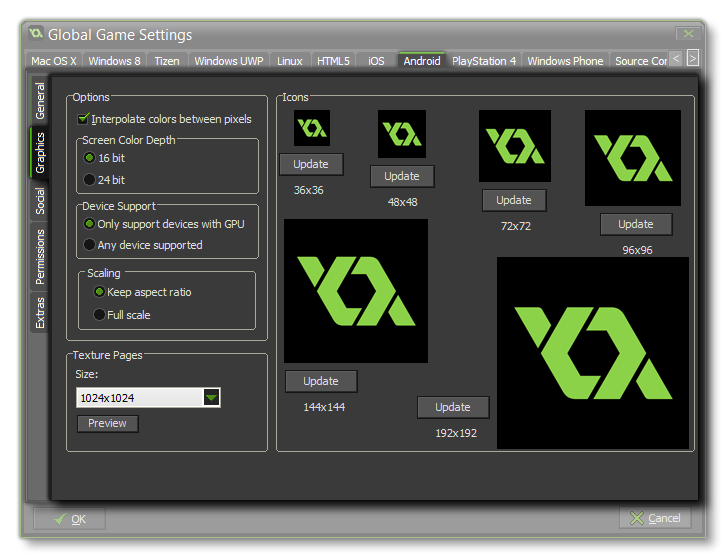 The graphics
tab has three sections to it - Options, Icons and
Texture Pages. The first of these controls the display
options for your game, with the first one being the Interpolate
colours Between Pixels flag. This turns on interpolation, which
basically "smooths" pixels, so for crisp pixel graphics, it should
be off, but if you have nice alpha blends and smoothed edge
graphics it is better left on.
The graphics
tab has three sections to it - Options, Icons and
Texture Pages. The first of these controls the display
options for your game, with the first one being the Interpolate
colours Between Pixels flag. This turns on interpolation, which
basically "smooths" pixels, so for crisp pixel graphics, it should
be off, but if you have nice alpha blends and smoothed edge
graphics it is better left on.
Next, you can set the Screen colour Depth to either
16bit or 24bit. This will affect the compatibility
with some older devices if it is set to 24bit, and will also
increase the ashmem that is needed (this is the shared
memory on Android devices).
The next here is the Device Support for your game. You can
choose to support any device, or only those that have a GPU.
Basically, if your game has any advanced drawing functions like
alpha blending, additive blending, surfaces, etc... you should
limit it to those devices that have a GPU otherwise you run the
risk of getting negative comments and poor rating for your game due
to graphical errors or crashes on older devices.
Finally there is the option for scaling to the device screen. Here
you can choose to maintain aspect ratio (so a 4:3 room, for
example, will be "letter boxed" on a 16:9) or to scale fully
(stretching the image to fit the full screen).
WARNING! Switching off the application
surface in your code will disable all the scaling options set in
the Global Game Settings until it has been switched back on again.
See The
Application Surface for further details.
After these options there is the section for setting the size of
the Texture Page. The default (and most compatible) size is
1024x1024, but you can choose from anywhere between 256x256 up to
2048x2048. There is also a button marked View which will
generate the texture pages for this platform and then open a window
so that you can see how they look. This can be very useful if you
wish to see how the texture pages are structured and to prevent
having texture pages larger (or smaller) than necessary.
On the right of the page you can set the game icons. These are used
in various situations on the Store and in your game, and should be
created as 24bit PNG files of the appropriate sizes given.
NOTE: Be aware that the larger the size of
the texture page, the less compatible your game will be.
Social
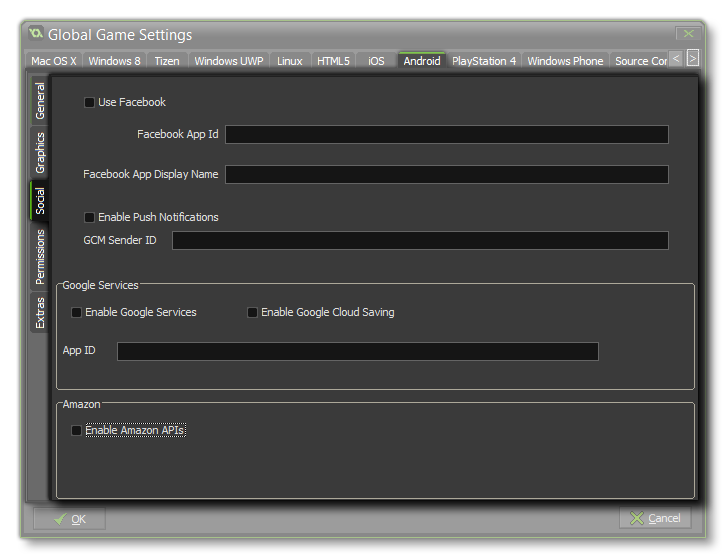 This tab
permits you to enable social functions for your Android game with
either Amazon GameCircle, Google Play, or
Facebook as well as activate Push Notifications.
This tab
permits you to enable social functions for your Android game with
either Amazon GameCircle, Google Play, or
Facebook as well as activate Push Notifications.
If you require the Facebook functions, you need to click the
"Use Facebook" checkbox and then supply the Facebook App
ID and Facebook App Display Name. Note that all Facebook
functionality is accessed via an extension, and when you first
check the Use Facebook box you will be prompted to download and
install the Facebook extension from the Marketplace (you may need
to log into your YoYo Account before it can be downloaded).
In order for your game to use Push Notifications they must
be enabled here first otherwise they will not work. Local
notifications on Android do not require the "GCM Sender
ID", but you must add it should you wish to create remote
notifications.
If you want to enable achievements and leader boards for the Google
app store, then you need to check the appropriate check box. Once
you have ticked one of the services, you will be prompted to
download and install the corresponding extension from the
Marketplace (you may need to log into your YoYo Account before it
can be downloaded), and then code the functionality into your game
using the
Achievements and Leader boards functions. Note that if you use
Google Play you will need to add your App Id into
this tab for the services to work (this can be found from your
Google Play Developers dashboard).
If you are using any Amazon Services, you need to tick the
"Enable Amazon API's" checkbox. Once you have ticked this, you will
be prompted to download and install the corresponding extension
from the Marketplace (you may need to log into your YoYo Account
before it can be downloaded). Unlike previous versions of
GameMaker: Studio, the Amazon API no longer hooks into the built in
leader board functions (like the Google APIs do) but instead has
all the functions included as part of the extension.
NOTE: This also needs to be ticked if you
require the use of the Amazon Services along with the Amazon Fire
target module.
Permissions
 From this
tab you can change some of the permissions that your game may
request within the Android Manifest. GameMaker:
Studio allocate permissions automatically as required, however
you may find you require a permission for your game that we haven't
assigned in which case tick the requisite permission box on the
tab. The list below outlines those that are available:
From this
tab you can change some of the permissions that your game may
request within the Android Manifest. GameMaker:
Studio allocate permissions automatically as required, however
you may find you require a permission for your game that we haven't
assigned in which case tick the requisite permission box on the
tab. The list below outlines those that are available:
- WRITE_EXTERNAL_STORAGE - Will permit your game to write
to external storage.
- READ_PHONE_STATE - Allow read only access to the phone
state.
- ACCESS_NETWORK_STATE - Permit your game to access
information about networks.
- INTERNET - Permit your game to open network
sockets.
- BLUETOOTH - Will permit your game to connect to paired
Bluetooth devices.
- RECORD AUDIO - Will permit your game to record audio
input from the microphone.
NOTE: If you are not sure that you need
these, you should probably just leave them un-checked by default
and let GameMaker: Studio deal with the permissions for your
game.
Extras
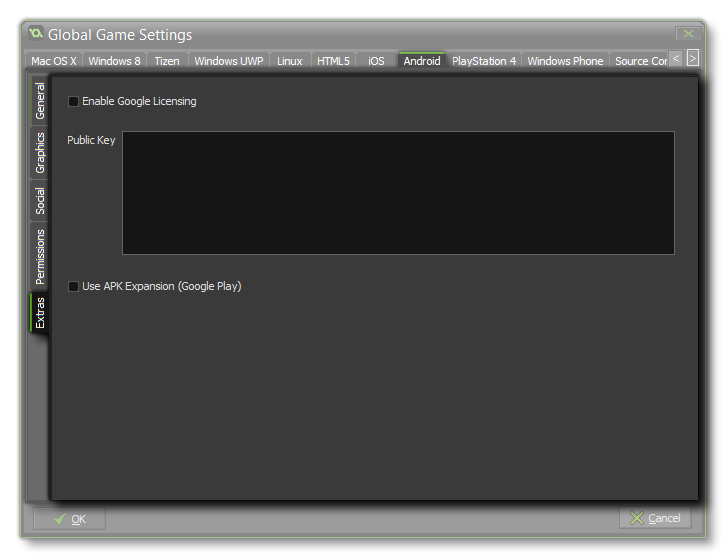 One of the
features of using Google Play for your Android games is the
ability to licence your games. This means that your games
will be controlled by Google so that only people that have
downloaded it through their market will be able to play the game,
thus avoiding illegal copies of your product from getting
distributed.
One of the
features of using Google Play for your Android games is the
ability to licence your games. This means that your games
will be controlled by Google so that only people that have
downloaded it through their market will be able to play the game,
thus avoiding illegal copies of your product from getting
distributed.
To activate this function in your game, you must first flag the
Enable Google Licensing box and then copy your Public
Key into the box as shown in the above image. This licence can
be found by going to your Google Play
Developers Page and then selecting the option Edit
profile. Once on the profile page, scroll down to the section
titled "Licensing & In-app Billing" and there you should
find the Public key that is needed for this functionality to be
enabled.
Once activated, if anyone who is not authorised to posses your game
tries to play it, they will be shown a pop-up message box that will
inform them that the Licence cannot be found on their device, and
then give them the option to retry and test again, or exit the
game.
Another feature of Licensing is that your game can then use apk
expansions. This is a way to bypass the 50MB maximum application
size imposed by Google Play (and only Google Play). It will create
your game in two parts: a small *.apk file and a larger
*.zip file which will hold all your games assets, both of
which are uploaded to the store. When the user first runs your
game, the zip will be downloaded and unpacked. You can find further
details of this option here.
© Copyright YoYo Games Ltd. 2015 All Rights Reserved